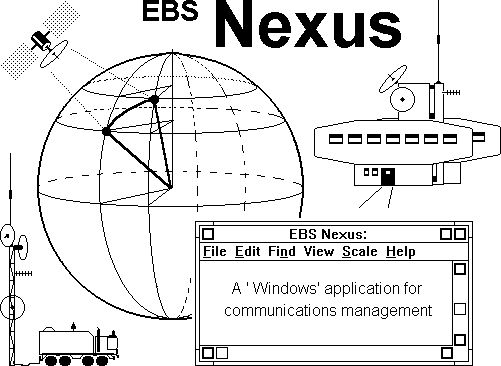
TECHNICAL OUTLINE
EBS NEXUS PROVIDES:
a fast database which identifies, locates, classifies and holds diary & dossier information for each of a large number of contacts.
criteria-based short listing of groups of contacts who must receive a particular message or participate in a specified communications session.
point-to-point communication with an individual contact, plus a list-driven point-to-multi-point communication with a prescribed group of contacts.
dynamic establishment and sustainment of coterie networks in which some or all or the nodes are mobile.
voice, vision, text, graphics and data communication as appropriate by various means such as mail, fax, data comms, ISDN, cellular, virtual private networks and direct private radio links.
The design of the EBS Nexus and its presentation in this document are the
Intellectual Property and Copyright of Robert John Morton.
THE DATABASE
The Nexus database windows enable you to:
- create a new database and enter details of new contacts
- retrieve details of existing contacts using various index fields
- browse through existing contacts in various index sequences
- search details of all contacts for the occurrence of a given text string
- update or delete retrieved contact details
The database itself holds details of a large number of contacts (human beings with whom you have occasion to communicate). These details are initially presented as a formal list in the List Window as follows:
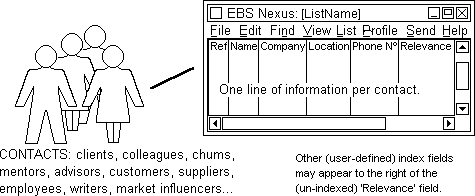
A Nexus database holds the following types of information for each contact on a List. (These windows are all linked via the View menu.)

The Identification Window
The Identification Window holds general information about a contact such as identity and location. A Map Window which displays the location of the contact concerned on a map derived from a GIS file supplements the formal location information.
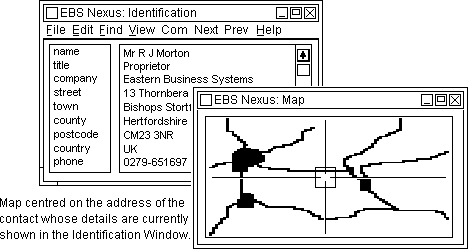
The Identification Window also holds data which enables you to contact a specific person. This includes their name and address (or vehicle index number) and their public communications network numbers (eg. for telephone, fax, data comms etc.). It is not necessarily the only set of data on file for making contact with that same person.
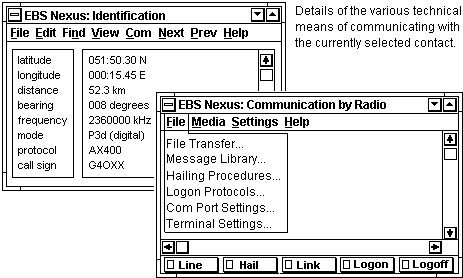
The Identification Window can also access a Communication Window which provides the means of communicating with the contact through a choice of media and in various modes.
The Classification & Status Window
The Classification & Status Window provides up to 16 Keys. Each key has a name which represents a list of up to 255 items. The classification and status of a given contact is created by marking the applicable items on each list. The maximum number of items which can be marked is determined separately for each key at implementation and configuration time. The lower this maximum number the less is the storage required for that key in each contact record.
To classify a contact you first go into Edit mode and then mark the name of a key in the left-hand dialogue box. In the example below the Type of Contact key has been selected. The list of possible values this key can have is then displayed in the right-hand dialogue box. You then mark one or more of these values (up to the predetermined maximum number for this particular key) which pertain to the contact (person) concerned.
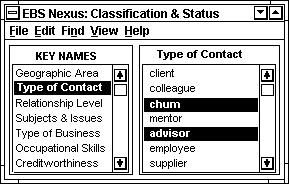
This contact is shown as being both a chum and an advisor. However, when you open the Classification & Status window it is normally in view mode as shown below. This displays the key names in the left-hand dialogue box as before, but only summarises the selected values of the key, ie the items in that key's list, which are currently marked:
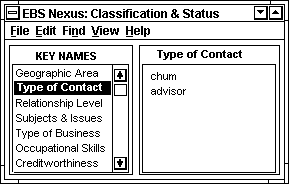
Other options within the Edit menu allow you to enter or change the names you want to use for your keys and their respective lists of values. This is only normally done at implementation time.
The Diary Window
For the last 12 communication events which have occurred between you and a given contact the Diary Window shows an automatically inserted date-stamp with the number of elapsed days since that event, plus the formal event type. Provision is also made for the entry of an optional one-line free-form comment. The last entry can be a future planned event.

The formal event type for a given diary entry is selected from a prescribed list which is set up at implementation time (but can with care be amended afterwards). This is done through a child Events Window accessible from the Diary Window.
The first few prescribed event types (eg. phone call, fax, letter, data file transfer) are reserved types: they cannot be changed by the user. This is because the Communication Window automatically updates the diary whenever it connects a successful phone call, sends a fax, produces a letter for mailing or conducts a file transmission to the person concerned.
Text messages (letters, faxes, telexes, RTTY messages etc.) pertaining to any of the last 12 events in the diary may be viewed in a Correspondence Window. Printed copies should be archived in paper correspondence files for permanent reference.
The Dossier File
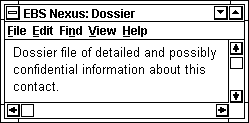
The dossier file is a word processor file attached to each contact record in which unlimited free-form comments about that contact may be entered.
TARGET SHORTLISTING
Nexus's target short-listing facility operates as follows:
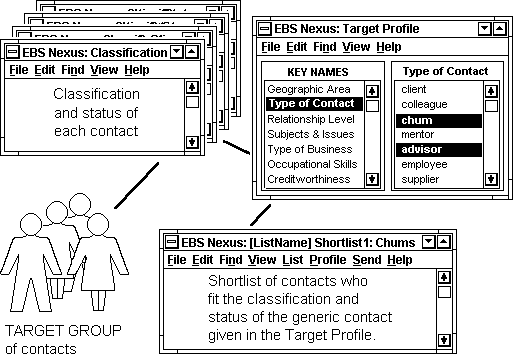
In the Target Profile window you enter the broad classification and status of the type of contact you want on your shortlist. Nexus then scans the details of every contact currently on the database, putting those who fall within the scope of your Target Profile on to the shortlist. You can then view the shortlist in the Target List window and cull off any individuals you specifically do not want. You are also free to add individual contacts to your new target shortlist as follows:
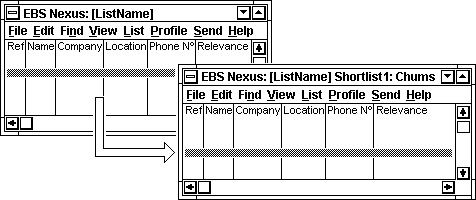
Up to 16 Target Profiles may be held on-file at any time, each of which may have an associated shortlist which it has been used to generate.
The window structure of the Target Short-listing facility is as follows:
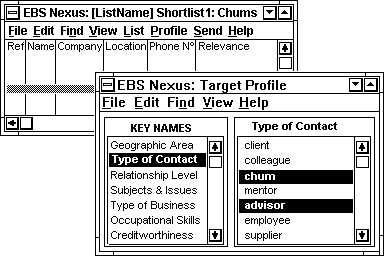
The Target List window is the main window and the Target Profile window is one of its child-windows. The above sample target profile will extract a shortlist of all contacts who are marked as chums and advisors. Other keys (not visible in the above illustration may impose further restrictions on who is and is-not included on the shortlist. A target profile may be edited at any time and a new corresponding shortlist generated.
Any previously-generated target list is accessible from within the Target List window. The Identification, Classification, Diary and Dossier windows of any contact appearing on a Target List are accessible from his line entry in the target list concerned:
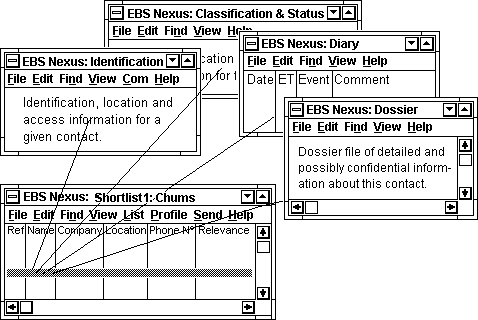
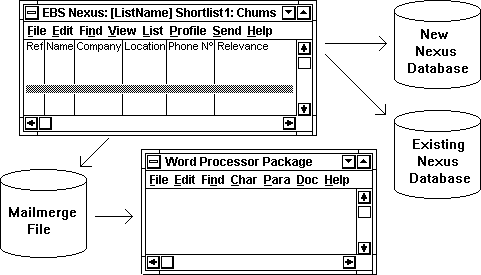
These generated target lists are then automatically accessible from the Communication Window for mailshots and multi-point communications such as telephone sessions and selective broadcasting of data files. The lists can also be exported as text files for such uses as mail-merging by word processing packages. A target list can also be exported as a new child Nexus database or transferred to another existing Nexus database:
A further child of the Target List window is a Statistics Window. This shows bar charts of the percentage of contacts who are on the current target list which have a given value of a given key. For example, the third bar down in the right-hand window below shows that 40% of the contacts on this target list are chums.

The example in the left-hand window shows a map of the U.K. which in reality would be divided up into a set of user-defined geographic areas. The accompanying bar chart shows what percentage of the contacts on the target list concerned are located in each area.
Nexus provides the means for communicating with a selected contact both by voice and by text.
COMMUNICATIONS
Nexus provides the means for communicating with a selected contact both by voice and by text. A voice conversation and a text communication are both referred to as a message. A message can have enclosures. These include other items and objects which are associated with a message and which are sent along with it.
A message could be a simple letter sent by mail. It could be a covering letter with an enclosure. Its enclosure could be a brochure, a printed report, an audio cassette, a diskette containing computer files or any other object you want to send. A message can also be sent by fax. It could be a simple letter, or a covering letter with an 'enclosed' follow-on document.
A message could be a letter sent as a text file to your contact's electronic mailbox which could be accessible either through the public telephone network or by direct point-to-point radio. Most electronic mail systems now accept binary files. A message could therefore be a covering 'letter' for any quantity or type of computer file — a text file, a word-processor or DTP file, a graphics image file, a program-specific data file, an executable file, a digital voice file and so on.
A message could be a telephone call to your contact. Its enclosures could be any number of computer files of any type sent by file transfer between your PC and his during the telephone call. Instead of a telephone call, the message medium could be a direct point-to-point radio call.
Messages
However, before you can send a message you must first prepare it. For this purpose, Nexus contains a Message Library Window:
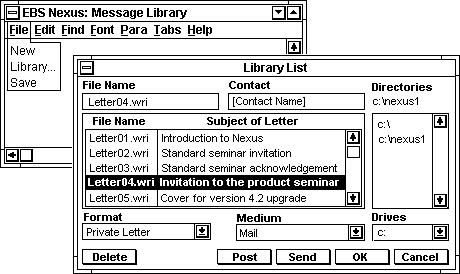
To originate a message you simply type it in on the main Message Library window and then save it. Note that here you write only the plain text of the message: no name & address or signatory information. The message is saved under a formal filename LetterNN.wri in the current Nexus database directory. The allocated filename then appears in the Library List box. You then fill in the corresponding Subject of Letter. This is a short description of the letter to help you identify it later.
If you now wish to write the text of another message, you simply press OK to get back to the main Message Library window. If you wish to delete this or any other existing message, Mark its entry in the list by double-clicking in its left margin. Then you click the Delete button.
If you wish to send to your contact this or any other existing message from the library, first mark its entry in the list as described above. Next check that the format you want the message to have is the one shown in the Format box at the bottom left of the library list.
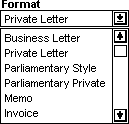 If not, open the format window and select the one you want. The business letter format assumes headed stationery. The private letter format assumes plain paper and therefore puts your own address at the top right. Parliamentary style omits "Dear... " and "Yours ... " which it assumes you will put in by hand. Memo format is simply headed by "To: ", "From:" and "Subject:" plus phone/fax numbers.
The invoice format is like a business letter, but omits the contact name, the "Dear... " and all signatory details.
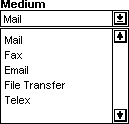 Next check that the medium through which you want to send the message is the one shown in the Medium box at the bottom right of the library list. If not, open the box and select the medium you want. Then click the Send button. The ensuing action depends on which medium you chose.
Mail
In this case clicking the Send button causes the message, encased in the format selected, to be printed immediately. A copy of the letter is posted to the contact's Correspondence Window for future reference. Enclosures, which for mail can be physical objects other than printable documents, are assumed to have been produced independently of their covering letter and so are not dealt with by Nexus.
Fax
In this case clicking the Send button causes the message, encased in the format selected, to be created as a fax file and transmitted immediately to the contact concerned. A copy of the fax is automatically posted to the contact's Correspondence Window for future reference. However, if you press the Post button instead, the fax file LetterNN.fax is stored in the contact's Outbound directory. Here it may be joined by other *.fax files containing follow-on 'enclosure' documents ready for transmission later. Transmission can be through the normal public telephone network, but it could equally well be by direct point-to-point radio or other means.
Email
Electronic mail works in exactly the same way as fax except that it allows all types of computer file to be sent: not just *.fax files. However, where the contact's electronic mailbox is accessed by radio, the linking protocol must be able to work automatically and reliably in order for the files to be transmitted immediately using the Send button.
File Transfer
This is in effect a manual or supervised version of electronic mail with the addition that it can be two-way.
With electronic mail, you receive files sent to you by all contacts who have left something in your mailbox since the last time you cleared it. However, during a file transfer session your contact can send files to you as well as you sending files to him.
File Transfer can be done automatically, but this requires your contact to have his PC on with his file transfer software in a state ready to receive at the time you choose to send. A file transfer is therefore usually done as an inset to a voice contact session. This allows both of you and your contact to monitor the transfer. It is of particular value when transferring files over an unreliable or intermittently open channel such as an HF radio path.
You will almost invariably use the Post button when doing File Transfers.
Telex
Telex works in the same way as fax except that only text files can be sent.
Transmission Methods
If you Post a message, it is not transmitted immediately. It is placed in the contact's outbound directory. To transmit the message, go to the contact's Identification Window. From here you can make a voice or data call to the contact concerned. First you double-click the Com item on the menu bar to display the Communication Window:

The Communication Window allows you to:
- enter the details of all the transmission media (carriers) you use
- select one of these carriers to be the currently active one
- enter/amend operating parameters for each carrier type
- connect to the contact concerned via the currently selected carrier
- speak to, or send or receive a data file to or from the contact
Call Connection
Pressing the Connect button will connect you to your currently selected contact automatically. To do this the Connect function uses the details specified for the currently selected common CARRIER service shown in the communications data window.
In the case of Radio, it calls the contact on the prescribed frequency, using the specified call sign, waits for the specified answer code, transmits in the required modulation mode and so on. In the case of the Public Telephone Network (PSTN) it dials the contact on the given telephone number and awaits connection. It follows corresponding procedures for the other types of common carrier service.
Once the Connect sequence has started, the Connect button becomes a Clear button. The progress of the connection sequence is shown by the four indicator 'lamps' on the right.
If you wish to expedite the connection procedure manually, you click the second button which in this example for Radio communication is labelled Tune. (For a PSTN connection it would be labelled Dial.) This will cause the manual Connection Window to be displayed:
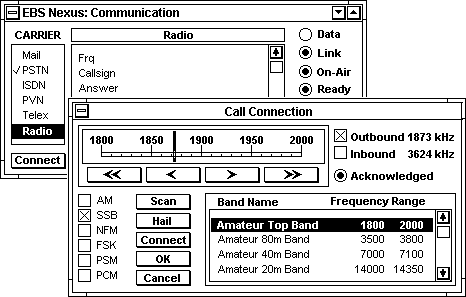
This window allows you to define a set of virtual radio frequency bands to suit your particular communications requirements. The example shows some of the amateur radio bands. To mark one of these bands you click in the left margin of the little scroll window next to the name of the band you want to use or search. An analogue presentation of that band appears in the band display at the top left of the window.
You can then sweep the band manually using the direction buttons below the scale. You can scan for existing signals by pressing the Scan button. In this case, the band will be swept automatically until a signal is found. To continue past a signal you simply press the Scan button again.
Two frequencies can be set up simultaneously: one for outbound signals, and one for inbound signals. Thus different bands and different positions of the 'tuning needle' can appear according to whether you have just marked the Inbound box or the Outbound box.
Pressing the Hail button causes the current contact's hailing sequence to be transmitted a predefined number of times. The Acknowledged 'lamp' indicates when the contact's correct acknowledgement sequence has been received. The Connect button puts you on-line, and, for appropriate transmission modes, establishes link level.
If you now press OK then the current inbound and outbound frequencies and modes will be stored for the currently selected contact. If you press Cancel then the contact's details will not be updated, but the settings you have just entered will remain in effect until you select another contact.
Data Communication
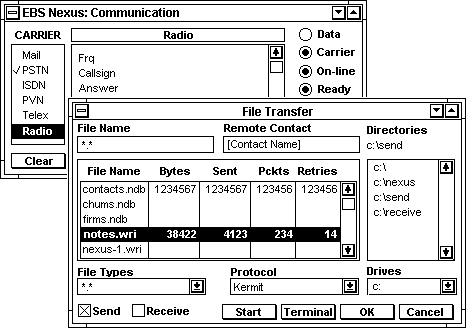
Pressing the File Xfer button causes the File Transfer window to appear:
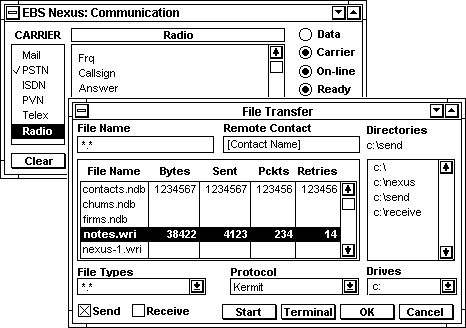
This allows you to mark the files you wish to send to your remote contact and then send them, or select a directory into which you want to receive files from your remote contact and then receive them.
Pressing the Terminal button causes the Terminal window to appear:
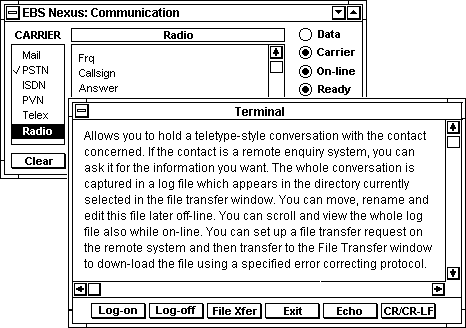
When the File Transfer window or the Terminal window appears, the Identification window disappears and the Communications window relocates to top left of screen to allow the two windows to be displayed together as shown.
To send files, press Send, and then press the Start button. To receive files from your contact, select the directory into which you want the files to be placed, select Receive, then press the Start button.
A single click opens a Communications Window which allows you to:
- create new message or letter texts
- retrieve, browse and edit existing messages from a message library
- print a text as an addressed and salutated letter in a variety of formats
- send a text as a headed and tailed message via the selected carrier
- send binary files to, and receive binary files from the contact concerned
- conduct a terminal session with the appropriate contact
When this is done, the main Communication Window accepts the details currently in this person's Communication Window as the context in which it will conduct a new communications interchange. That is, it is this person with whom the Communication Window will establish a communications link, and to whom all ensuing communications activity will be directed by the means and in the mode specified in the contact's Communication Window.
The Communication Window also uses the range and bearing information given by the Map Window to direct the servo which steers the appropriate dish or antenna in the direction of the other party's current location.
From the Identification Window you can also open the Account Window. This holds all the currently active transactions pertaining to this individual, plus creditworthiness information, a summary of all past business and targeted future business.

The full operation of the Account Window is dealt with elsewhere.
ARCHITECTURE
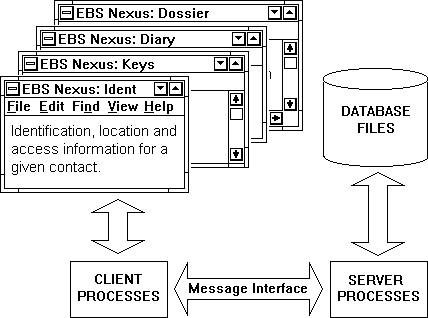
The database is a client-server type. The presentation and manipulation functions reside at each seat (user PC or workstation). The database and its access processes reside at the server (a software object which may be installed in the same or another PC on the network).
Communication between a client and server is by way of an industry standard set of query & command messages. This means that a Nexus installation's clients and servers can be installed at different nodes within the coterie network it is managing.
Refer to Scientific American Sept 1984: Software for Information Management. B Tree. The idea of extracting the top B Tree node into memory at switch-on or whenever an index item is added, deleted or modified.
©1998 Robert John Morton
![]() My Software
My Software


 If not, open the format window and select the one you want. The business letter format assumes headed stationery. The private letter format assumes plain paper and therefore puts your own address at the top right. Parliamentary style omits "Dear... " and "Yours ... " which it assumes you will put in by hand. Memo format is simply headed by "To: ", "From:" and "Subject:" plus phone/fax numbers.
 Next check that the medium through which you want to send the message is the one shown in the Medium box at the bottom right of the library list. If not, open the box and select the medium you want. Then click the Send button. The ensuing action depends on which medium you chose.


